Moving day is coming up, and you’re staring at a pile of empty boxes wondering where to start. Sound familiar? Don’t worry – you’re not alone. Learning how to label boxes for moving properly can make the difference between a smooth move and a stressful mess.
Think about it: when you arrive at your new home tired and ready to unpack, the last thing you want is to dig through twenty boxes just to find your toothbrush. Good box labeling saves you time, keeps your stuff safe, and makes settling in so much easier.
Ready to become a box labeling pro? These nine simple tricks will help you stay organized and make your move a breeze.
1. Use Colors for Each Room
Here’s a game-changer: give each room in your new home its own color. Grab some colored tape or markers and pick a color for each space. Maybe blue for the master bedroom, green for the kitchen, and red for the living room.
Why does this work so well? Your movers can see the colors instantly and know exactly where each box goes. No reading required! Just put matching colored tape on each doorway in your new house, and you’re all set.
This simple trick speeds up the whole moving process and prevents boxes from ending up in the wrong rooms.
2. Number Every Box and Make a List
This is one of the smartest things you can do when learning how to label boxes for moving. Give each box a unique number starting with Box #1, and keep going until every single box has its own number. Then create a master list that tracks everything.
What Should Your Box List Include?
Your inventory list needs three key pieces of information for each box:
- Box number (like #15 or #42)
- Detailed contents (not just “kitchen stuff” but “coffee maker, toaster, mixing bowls”)
- Destination room (master bedroom, guest bathroom, home office)
How to Create Your Inventory System
You have several options for keeping track of your numbered boxes:
Option 1: Old-School Notebook Use a regular notebook and write down each box by hand. This works great if you prefer writing things down and don’t want to worry about your phone battery dying.
Option 2: Phone Notes App Type your list into your phone’s notes app. This is handy because you always have your phone with you, and you can easily search for specific items.
Option 3: Spreadsheet Create a simple spreadsheet on your phone or computer. You can sort by room, search for items, and even share the list with family members helping you unpack.
Option 4: Moving Apps Download a moving app that’s designed specifically for tracking boxes. Many of these let you take photos of contents and organize everything automatically.
Sample Box Entry
Here’s what a good box entry looks like:
Box #27
- Contents: Winter coats, boots, scarves, gloves, hats
- Room: Master bedroom closet
- Notes: Heavy box – needs two people to carry
Why This System Works So Well
Let’s say you’re looking for your coffee maker on day two in your new home. Instead of opening random boxes and making a bigger mess, just check your list. You see that Box #15 contains kitchen appliances. Boom – you found it in seconds instead of spending an hour digging around.
This system also helps in these situations:
- When family members ask where something is: Just hand them the list or tell them the box number
- When movers ask where boxes go: You can quickly tell them which room each numbered box belongs in
- When you’re deciding what to unpack first: Scan your list to find the boxes with your most important items
What Happens If a Box Goes Missing?
Moving companies sometimes lose boxes. It’s rare, but it happens. When you have a detailed numbered list, you’ll know exactly what was in that missing box. This makes filing insurance claims much easier and helps the moving company search for your specific items.
Without a list, you might not even realize something’s missing until weeks later when you’re looking for that special serving bowl your grandmother gave you.
How Detailed Should You Get?
You might wonder how much detail to include in your list. Here’s a good rule: write down anything you’d be upset about losing or anything worth more than $50.
Too general: “Bedroom stuff” Just right: “Sheets, pillows, alarm clock, jewelry box, family photos” Too detailed: “Blue sheets with white trim, two down pillows from Target, digital alarm clock model XYZ-123”
Tips for Staying Organized While Making Your List
Start early: Don’t wait until moving day to create your system. Start numbering and listing boxes as you pack them.
Keep your list handy: Whatever method you choose, make sure you can access it easily on moving day.
Update as you go: If you add something to a box after you’ve already listed it, update your list right away.
Make a backup: If you’re using your phone, email yourself a copy of the list. If you’re using a notebook, take photos of the pages.
Common Questions About Box Numbering
Should I restart numbering for each room? No, use one continuous numbering system for all your boxes. This prevents confusion and makes your master list easier to follow.
What if I run out of space in a box after I’ve numbered it? Just pack what fits and start a new box with the next number. Don’t try to cram everything in – you’ll risk breaking things.
Can I skip numbers if I decide not to pack a box? Yes, that’s fine. If you decide you don’t need Box #23, just skip to Box #24. Your list will show which numbers you actually used.
Should I number boxes differently for different rooms? Stick with one numbering system for everything. You can sort by room in your list, but keep the box numbers simple and sequential.
This numbering system might seem like extra work at first, but it’s honestly one of the best investments of time you can make during your move. You’ll save hours of searching and feel so much more in control of the whole process.
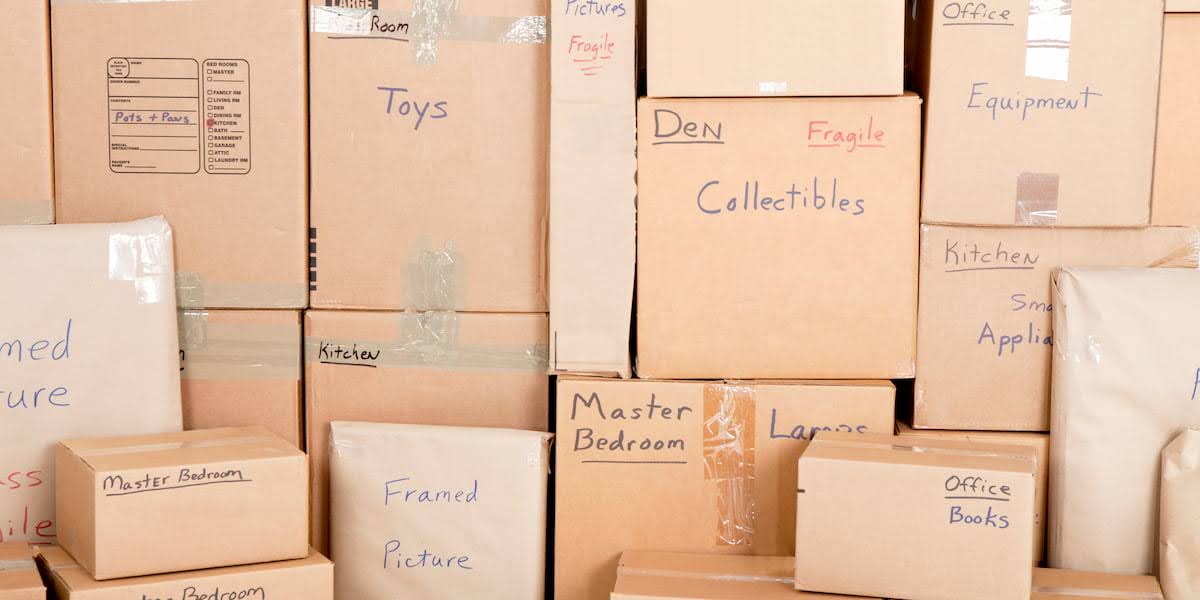
3. Write on Multiple Sides of Each Box
Don’t just label one side of your boxes. Write clear descriptions on the top and at least one side of every box. This way, you can read the label no matter how the boxes are stacked.
Be specific about what’s inside. Instead of writing “bedroom stuff,” try “winter clothes and extra blankets.” The more details you include, the easier it’ll be to find things later.
Good box labeling means being detailed enough that anyone could understand what’s inside.
4. Mark Your Must-Have Boxes
Some boxes are way more important than others, especially when you’re learning how to label boxes for moving effectively. These are the boxes that contain everything you’ll need to survive your first day or two in your new home. Use bright stickers, colored tape, or bold writing to mark these special boxes so they stand out from everything else.
How to Mark Priority Boxes
You have several ways to make these boxes impossible to miss:
- Bright neon stickers with words like “OPEN FIRST” or “ESSENTIAL”
- Colored duct tape in a bright color like hot pink or electric yellow
- Bold black marker writing “PRIORITY” in huge letters on all sides
- Star stickers combined with written labels
- Different colored boxes entirely (if you can find them)
The key is making these boxes so obvious that even tired movers on a long day can spot them instantly.
What Goes in Your Essential Boxes?
Think about your first 24-48 hours in your new home. What will you absolutely need before you have time to unpack properly?
Personal Care Items:
- Toiletries for each family member
- Medications (very important!)
- Towels and washcloths
- Toilet paper
- Hand soap
- Toothbrushes and toothpaste
Basic Clothing:
- One complete outfit per person
- Pajamas for everyone
- Underwear and socks
- Comfortable shoes
Electronics and Communication:
- Phone chargers for everyone
- Laptop charger if you work from home
- Basic extension cords
- Flashlights and batteries
Food and Kitchen Basics:
- Paper plates and cups
- Plastic utensils
- Coffee maker and coffee (if you’re a coffee person!)
- Snacks that don’t need cooking
- Can opener
- One pot and one pan
Cleaning and Tools:
- Basic cleaning supplies
- Paper towels
- Trash bags
- Screwdriver set
- Hammer
- Scissors
- Box cutter
The “Survival Box” Strategy
Here’s a game-changing approach: pack one survival box for each person in your family. Each box should contain everything that person needs for 2-3 days.
For Adults:
- 3 days of clothes
- Personal toiletries
- Any daily medications
- Phone charger
- Important documents (in a waterproof folder)
- Comfortable shoes
- Basic first aid items
For Kids:
- 3 days of clothes in current sizes
- Favorite stuffed animal or comfort item
- A few favorite toys or books
- Any special medications
- Comfort snacks
- Extra pacifiers (for little ones)
For Babies:
- Diapers and wipes
- Formula or baby food
- Bottles and sippy cups
- Favorite blanket
- Change of clothes for multiple accidents
- Baby medications
How Many Priority Boxes Should You Have?
Most families need 3-5 priority boxes total. Here’s a good breakdown:
- 1 box per person for personal survival items
- 1 shared box for basic tools and cleaning supplies
- 1 shared box for basic kitchen items
- 1 box for important documents and electronics
Where Should These Boxes Go?
Make sure your priority boxes are the first ones loaded into the moving truck and the last ones taken off. This means they’ll be easy to grab as soon as you arrive at your new home.
Tell your movers specifically about these boxes. Say something like, “These five boxes with the bright pink tape need to come off the truck first and go straight into the kitchen where I can get to them.”
Common Mistakes to Avoid
Don’t pack too much in priority boxes. You want to be able to carry these yourself if needed. Keep them under 30 pounds each.
Don’t assume you’ll remember which boxes are priorities. Even if you think you’ll remember, mark them clearly. Moving day is stressful and you might forget.
Don’t pack priority items in big boxes with other stuff. Keep essential items in their own dedicated boxes so you don’t have to dig through other things to find them.
Questions People Ask About Priority Boxes
Should I pack a priority box for my pets? Absolutely! Include food, water bowls, leash, favorite toys, any medications, and comfort items. Moving is stressful for pets too.
What if I’m moving far away and staying in a hotel? Pack an overnight bag separate from your priority boxes. The priority boxes are for when you get to your new home, not for the hotel.
Should I label priority boxes with what’s inside? Yes, but keep it general. Write “John’s Survival Kit” or “Essential Bathroom Items” rather than listing everything. You want them clearly marked but not advertising valuable contents.
Can I have too many priority boxes? Yes! If everything is a priority, then nothing is. Stick to true essentials that you’ll need in the first 1-2 days.
The Reality Check
Here’s the truth: you’ll be exhausted on moving day. You might not feel like cooking a fancy meal or unpacking your entire wardrobe. These priority boxes are about survival and basic comfort, not about making your new place look perfect right away.
Focus on having clean clothes, basic food options, a way to shower, and a comfortable place to sleep. Everything else can wait until you’ve had a good night’s rest in your new home.
5. Protect Your Breakables
When you’re packing fragile items, make it obvious. Write “FRAGILE” and “HANDLE WITH CARE” in big, bold letters on multiple sides of the box.
Don’t forget to show which way is up! Draw arrows or write “THIS SIDE UP” for boxes with electronics, artwork, or anything that could break if turned upside down.
Use bright colors for these warnings. The goal is to make sure anyone handling your boxes can see these instructions right away.
6. Put Lists Inside Boxes Too
Here’s a smart trick that most people never think of: put a detailed list of contents inside each box along with your outside labels. This double-layer approach to box labeling gives you backup protection and makes unpacking so much easier.
Why You Need Inside Lists
Even the best outside labels can have problems during a move:
- Labels fall off from rough handling or weather
- Writing gets smudged if boxes get wet or dirty
- Tape covering labels gets torn or damaged
- Boxes get stacked so you can’t see the outside labels
- Multiple people are helping and they can’t read your handwriting
When you have a list inside the box, you always know what should be there, no matter what happens to the outside label.
How to Create Inside Lists
Use bright colored paper so the list stands out when you open the box. Neon yellow, bright pink, or orange work great. You want to spot that list immediately.
Print or write clearly. If you’re handwriting the lists, use a dark pen and write big enough that anyone can read it easily.
Make it detailed. This inside list can be more detailed than your outside label since space isn’t limited.
Include the box number. Write the same box number that’s on the outside so everything matches your master inventory.
What to Include on Inside Lists
Your inside list should have:
- Box number (matching the outside)
- Destination room
- Complete contents list with specific details
- Any special notes about fragile items or assembly instructions
- Your contact information (in case the box gets separated)
Sample Inside List
Here’s what a good inside list looks like:
BOX #34 – MASTER BEDROOM
Contents:
- Winter comforter (blue and white)
- 2 feather pillows
- Flannel sheet set (queen size)
- Electric blanket with controller
- 3 throw pillows from living room couch
- Bedroom slippers (his and hers)
Special Notes:
- Electric blanket controller is wrapped in bubble wrap
- Throw pillows go to new living room eventually
Contact: [Your phone number]
Different Types of Inside Lists
Basic Inventory List: Simple list of everything in the box
Photo Inventory: Take a picture of items before packing, print it, and tape it inside the box
Assembly Instructions: For furniture or electronics, include notes about how things go back together
Priority Instructions: Notes about what to unpack first from that box
Where to Put Lists Inside Boxes
Tape to the inside of the box lid so you see it as soon as you open the box
Put in a clear plastic sleeve to protect it from getting torn
Place on top of contents so it’s the first thing you see
Attach to a clipboard if you have multiple pages
Questions About Inside Lists
Should every box have an inside list? Ideally, yes. It only takes a minute per box and can save you hours later. But if you’re short on time, prioritize boxes with valuable items, electronics, or things you’ll need soon.
What if I’m packing at the last minute? Even a quick handwritten list on regular paper is better than nothing. Write the box number and top 5-10 items in the box.
Should I include prices or values on the list? Only if you need it for insurance purposes. Otherwise, just list the items without values to avoid advertising expensive contents.
Can I use the same list for my master inventory? Absolutely! You can photocopy or photograph your inside lists to create your master inventory. This actually saves time since you’re not writing everything twice.
Making Lists Quickly
Use your phone to dictate lists while you pack, then print them out
Take photos of items as you put them in boxes, print the photos, and tape them inside
Write lists while watching TV or during other downtime
Get family members to help by having them write lists while you pack
The Insurance Benefit
Having detailed lists inside boxes is super helpful if you need to file an insurance claim for damaged or lost items. You’ll have a clear record of exactly what was in each box, which makes the claims process much smoother.
Professional moving companies are also more likely to take extra care with boxes when they can see you’ve documented everything carefully.
What Happens When You Unpack
Here’s the best part: when you’re unpacking in your new home, these inside lists become your unpacking guide. You can:
- See everything that should be in the box before you start
- Check off items as you unpack them
- Know immediately if something is missing
- Decide what to unpack first from each box
- Know where things belong based on your notes
Time-Saving Tips
Use a template. Create a basic format on your computer and just fill in the details for each box.
Pack by category. When you put similar items together, your lists are shorter and easier to write.
Include family members. Have kids help by drawing pictures of their toys for their boxes, or have your partner write lists while you pack.
This inside list system might seem like extra work, but it’s honestly one of the smartest things you can do. You’ll feel so much more organized and confident about your move when you know exactly what’s in every single box.
6. Put Lists Inside Boxes Too
Here’s a smart trick: put a list of contents inside each box along with your outside labels. Print these lists on bright paper so they’re easy to spot when you open the box.
Why do this extra step? Sometimes outside labels fall off or get damaged during the move. Having a backup list inside the box means you’ll always know what should be there.
7. Make Your Labels Waterproof
Rain happens, and so does rough handling. Protect your hard work by using waterproof labels or covering written labels with clear tape.
Even better, write directly on the box with a permanent marker. This creates labels that can’t fall off or get ruined by water.
Your future self will thank you when your labels are still readable after a long moving day.
8. Keep Valuable Items Safe
Don’t advertise what’s valuable by writing it on the outside of boxes. Instead, use code words that only you understand.
For example, write “Office Items A” instead of “Expensive Computer Equipment.” Keep a separate, private list that tells you what each code means.
This smart approach to box labeling protects your valuable stuff while keeping you organized.
9. Plan When You’ll Unpack Each Box
Think ahead about when you’ll actually need the items in each box. Label them “Week 1,” “Week 2,” or “Can Wait” based on priority.
This helps you unpack in the right order. Focus on essentials first – like bedding and basic kitchen items. Save the decorative stuff and seasonal items for later.
You’ll feel much more organized if you’re not opening random boxes and creating more mess.
Extra Box Labeling Tips
Want to take your labeling game to the next level? Try these bonus ideas:
Take pictures of how your electronics are set up before you disconnect them. Tape printed copies of these photos to the boxes. You’ll save so much time when setting things up again.
Use different colored stickers to show who owns what. This works great for kids’ toys or personal items that might get mixed up.
If you’re tech-savvy, create QR codes that link to detailed lists on your phone. Just scan the code to see everything in that box.
Making Moving Day Easier
Good box labeling turns moving from a nightmare into something manageable. When you know what’s in each box and where it goes, you can focus on enjoying your new home instead of hunting for your stuff.
The time you spend labeling boxes properly pays off big time. You’ll find what you need faster and feel less stressed during those first important days in your new place.
Ready for a Stress-Free Move?
Learning how to label boxes for moving is just one part of staying organized during a big move. If planning and coordinating everything feels like too much, you don’t have to do it alone.
Moving to a beautiful home in Palm Beach County should be exciting, not overwhelming. At Palm Beach Organized, we help families like yours make smooth transitions to their new homes. We can help you sort through your belongings before you move, create packing systems that work, and set up your new home so everything has its perfect place.
Ready to make your move as stress-free as possible? Contact us today to learn how our professional organizing services can turn your moving day into the start of your most organized life yet.
.
6. Put Lists Inside Boxes Too
Here’s a smart trick: put a list of contents inside each box along with your outside labels. Print these lists on bright paper so they’re easy to spot when you open the box.
Why do this extra step? Sometimes outside labels fall off or get damaged during the move. Having a backup list inside the box means you’ll always know what should be there.
7. Make Your Labels Waterproof
Rain happens, and so does rough handling. Protect your hard work by using waterproof labels or covering written labels with clear tape.
Even better, write directly on the box with a permanent marker. This creates labels that can’t fall off or get ruined by water.
Your future self will thank you when your labels are still readable after a long moving day.
8. Keep Valuable Items Safe
Don’t advertise what’s valuable by writing it on the outside of boxes. Instead, use code words that only you understand.
For example, write “Office Items A” instead of “Expensive Computer Equipment.” Keep a separate, private list that tells you what each code means.
This smart approach to box labeling protects your valuable stuff while keeping you organized.
9. Plan When You’ll Unpack Each Box
Think ahead about when you’ll actually need the items in each box. Label them “Week 1,” “Week 2,” or “Can Wait” based on priority.
This helps you unpack in the right order. Focus on essentials first – like bedding and basic kitchen items. Save the decorative stuff and seasonal items for later.
You’ll feel much more organized if you’re not opening random boxes and creating more mess.
Extra Box Labeling Tips
Want to take your labeling game to the next level? Try these bonus ideas:
Take pictures of how your electronics are set up before you disconnect them. Tape printed copies of these photos to the boxes. You’ll save so much time when setting things up again.
Use different colored stickers to show who owns what. This works great for kids’ toys or personal items that might get mixed up.
If you’re tech-savvy, create QR codes that link to detailed lists on your phone. Just scan the code to see everything in that box.
Making Moving Day Easier
Good box labeling turns moving from a nightmare into something manageable. When you know what’s in each box and where it goes, you can focus on enjoying your new home instead of hunting for your stuff.
The time you spend labeling boxes properly pays off big time. You’ll find what you need faster and feel less stressed during those first important days in your new place.
Ready for a Stress-Free Move?
Learning how to label boxes for moving is just one part of staying organized during a big move. If planning and coordinating everything feels like too much, you don’t have to do it alone.
Moving to a beautiful home in Palm Beach County should be exciting, not overwhelming. At Palm Beach Organized, we help families like yours make smooth transitions to their new homes. We can help you sort through your belongings before you move, create packing systems that work, and set up your new home so everything has its perfect place.Ready to make your move as stress-free as possible? Contact us today to learn how our professional organizing services can turn your moving day into the start of your most organized life yet.

